Edges Map
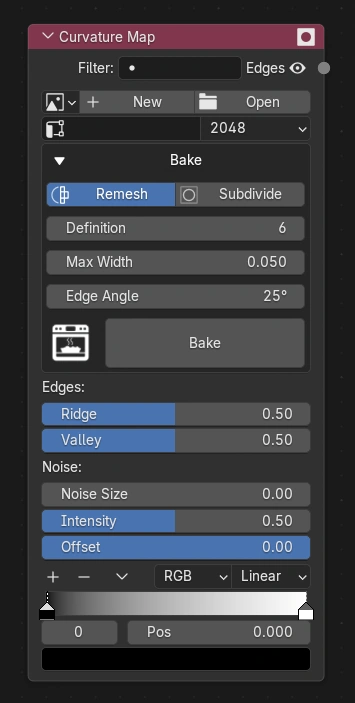
What's it for ?
Edges Map is an edges mask baked from the geometry of the object. It detects the ridges (convex edges) and the valleys (concave edges) of the mesh and stores them in an EXR texture, so the mask follows the shape exactly, with a clean and constant width, and without any render-time ambient occlusion.
Compared to the Edges Mask, which is computed live, the Edges Map is baked once : it is more precise and lighter at render time, but it has to be baked again when the mesh changes.
The node has a single output, Edges (a value), which is the maximum of the ridge and the valley masks, with some noise, shaped by the color ramp. Like the smart masks, it has a dynamic input socket to combine it with other masks.
How to use it
- Select the mesh and add the Edges Map node.
- Pick a UV map (the object needs unwrapped, non overlapping UVs) and the size of the texture on its right.
- Pick an image in the field (a drop-down of the images of the file) to bake into it, or leave it empty : the bake creates the image for you.
- Tune the options of the Bake panel with the Preview (see below), then click Bake.
- Adjust Ridge, Valley and Noise : they are live, no need to bake again.
Note
The object has to be in Object Mode. The bake runs in Cycles (1 sample) in a temporary scene, nothing of your scene is modified.
Bake panel
| Option | Description |
|---|---|
| Remesh / Subdivide | How the copy of the object used for the computation is rebuilt. Remesh uses a Remesh modifier in Sharp mode. Subdivide subdivides the original mesh (Simple keeps the original edges and their angles, Catmull-Clark smooths them). |
| Definition | (Remesh) Octree depth of the remesh. Higher is finer and heavier. 6 works well for most objects, a higher value picks up small bevels and mesh noise as extra edges. |
| Subdivide | (Subdivide) Number of subdivision levels. Each level multiplies the face count by 4. |
| Max Width | Width of the baked gradient around each edge, as a fraction of the object size. It is the largest band the node can show. 0 bakes the plain curvature instead of a distance (soft, blurred). |
| Edge Angle | Minimum angle between two faces for an edge to count as sharp. |
| Preview | Shows a live preview on the object itself (see below). The button on its right shows its wireframe. |
| Bake | Duplicates the object, rebuilds the copy, computes the distance to the convex / concave edges and bakes it through the UV map into the EXR texture (R = ridges, G = valleys). |
Tip
With a very dense or sculpted mesh, the angle between two neighbouring faces is tiny. Use Remesh, or lower the Edge Angle when using Subdivide.
Tip
Changing the size of the texture and baking again into the same image resizes it, the file keeps its path.
Preview
Check Preview to see the result directly on the object, before baking. The remesh (or subdivision) and the edge computation are added at the end of the object's modifier stack, driven by the node : Definition, Subdivide, Edge Angle and Max Width update the object in real time, so you can tune them before baking.
- Switch the viewport to Material Preview : the ridges are red and the valleys are green. Only the displayed mesh is replaced : the object keeps its own materials (and its GhostTree stays in the node editor).
- The button with the wireframe icon, on the right of the checkbox, shows the wireframe of the object, to check the remeshed topology.
- The preview modifiers are hidden from the render and from Edit Mode.
- Changing the Remesh / Subdivide mode, the subdivision type or setting Max Width to / from 0 rebuilds the preview.
- Uncheck Preview (or delete the node) to remove the modifiers : the object is back to its normal look.
Note
The preview is computed per vertex : it does not show the texture resolution or the UV, and the quads shaped like triangles that the bake cleans up are not cleaned in the preview.
Edges
| Option | Description |
|---|---|
| Ridge | Width of the band around convex edges, as a fraction of Max Width. 0 hides the ridges. |
| Valley | Width of the band around concave edges, as a fraction of Max Width. 0 hides the valleys. |
The gradient always goes from 1 on the edge to 0 at the border of the band, whatever the value.
Noise
Makes the mask irregular and can punch holes in the edges, like a worn edge.
| Option | Description |
|---|---|
| Noise Size | Scale of the noise. 0 = no noise (the mask is unchanged). |
| Detail | Number of noise layers : higher gives finer detail. |
| Roughness | How much each layer contributes compared to the previous one. |
| Intensity | How strongly the noise modulates the mask. |
| Offset | Lowers the whole mask : where the noise is low, the mask drops to 0 and makes holes. 0 = no holes, the more negative the bigger the holes. |
Color ramp
The color ramp at the bottom of the node is applied at the very end, after the noise, to shape the mask (contrast, soft or hard borders, inversion...).
Combining with other masks
The empty socket on the top left of the node is the combine socket, like on the smart masks. Plug another mask into it : it becomes a MixOut socket where you choose the output to mix and the blending mode, and you can mute the mix or remove the socket. A new empty socket appears to add more masks.
The texture file
Like the font atlases, the baked EXR is stored in an Edges Maps folder next to the .blend file.
Save the texture
If the .blend file is not saved yet, the EXR is written in a temporary folder : the image field is red with a disk icon. Save the .blend file, then click the disk icon to write the texture in the Edges Maps folder.
Note
Baking again in the same image overwrites its EXR file.